4training:Creating and Uploading Files
All translation work is done in the wiki system and is immediately available for others as well. Additionally we want to provide PDF files for each worksheet as well so that people can download them, print them and use them right away. This step needs some manual work. We provide PDF files as well as odt files as their "source files". For this we use LibreOffice (former OpenOffice) as it is free software and we have a python tool that can automatically do almost everything of this task. This is how the process works (TODO this video is a bit outdated - some of the steps shown are not necessary anymore due to improvements of the ODT generator):
Tool: ODT-Generator
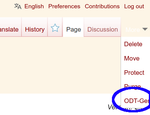
Go to the page in your language where you want to create the ODT file. In the top right menu, select More -> ODT-Generator. This starts Generateodtbot in the background: It automatically downloads the English odt file, searches for each translation unit, replaces it with your translation from the system and uploads the translated odt file to the following dropbox folder: https://www.dropbox.com/sh/sghbc73ekwm39r2/AADPw-KftZkwjXUM6e3Xqdtpa?dl=0
Look into the subfolder with the language code of your language. There you should find your file that has already all content at the right place :-) Besides, you will a receive an email with remarks on potential problems. These remarks are also available in the dropbox in the "logs" subfolder of your language. Please check them and correct issues. If you're unsure about their meaning, first check the FAQ and ask an administrator for further help.
If there were no issues and the generated PDF looks good (and fits on the same amount of pages as the original PDF), you can directly upload the files and are down :-)
Otherwise you need to edit the ODT file and tweak the formattings until everything fits. For that look at the following documentation:
Formatting the translated odt file
Using styles and formatting
We want to avoid the traditional way of "mark some section, change its formatting, mark the next section, change its formatting, change your mind, start again, ..." (imagine you want to change the font size from 10.5pt to 11pt everywhere. And later discover that it doesn't fit and want to change it back...)
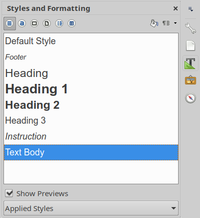
Instead we consistenty use the styles. Every section in a worksheet belongs to one of a handful different styles. Then you only need to change these few styles and the worksheet will have a consistent layout. Typically we use the following styles:
- Heading 1
- the top headline at the very beginning
- Heading 2
- for the big section headings
- Heading 3
- for sub-headlines
- Heading 4
- Some worksheets may use this style for sub-sub-headlines
- Text Body
- All normal text
- Default Style
- This is something like a "mother" style for all other styles. We don't use it directly and only change overall settings like the language or font of your document
- Heading
- This is also a "mother" style for all Heading styles. You could make changes here that apply to all Heading styles
- Footer
- for formatting the footer with the note that all content is copyright-free.
You can open the view of "Styles and formatting" by pressing F11 (see the picture to the right). At the bottom select "Applied Styles" to only view the styles that are relevant. By right-clicking on a style you can modify it. All changes will be automatically applied to all sections in the worksheet that have this specific style.
More details: https://wiki.openoffice.org/wiki/Documentation/Writer_for_Students/Style_Basics
Fit everything on two pages
Try everything to fit it on two pages :-) If all possible the pages should break at the same positions as in the English file. When the original file has only one page, try to fit it also into one page. This is very helpful for printing and using the file.
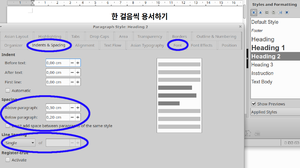
It should be sufficient to change "Spacing" and "Line Spacing" in Indents & Spacing and "Family", "Style", "Size" and "Language" in Font of a style (see picture to the right).
Some hints in case it still doesn't fit:
- Make sure Line Spacing is "Single". Reduce spacing before and after paragraph.
- Change the font size of Text Body e.g. to 10.5pt
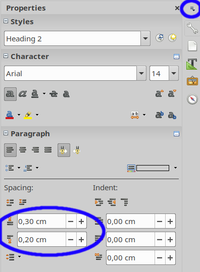
- Sometimes it's helpful to change the formatting of one individual headline / paragraph. Select it and change the spacing (see picture to the right)
- Sometimes adjusting the size of a box etc. on the worksheet can help
- Only change margins of the page (Format -> Page) as a last resort
Font choice
Our standard font is Arial. This may change if there is good arguments for something else. It seems to cover all of unicode and works with many languages/scripts, but apparently Arial doesn't have genuine bold and italic for some unicode blocks. You won't notice that when editing a worksheet in LibreOffice, as it can emulate bold or italic. But after exporting the document to PDF, the PDF doesn't have any bold or italic (or both) and looks not as good as before. It took a while to understand the reason for this unexpected behavior...
We can define different standard fonts for specific languages. Currently we're using the font "Gentium" for some Indian languages as it covers more than Arial does. Please talk to an administrator to set this up, afterwards the generator tool will automatically select this font in the created files for your language.
Set correct file properties
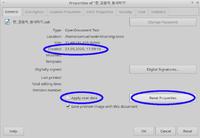
In the LibreOffice menu select "File" -> "Properties" to edit the document properties.
- Make sure you don't save your personal user data (your name) in the file. We don't want the names of translators be publicly visible.
- Reset the editing details.
- The tool should have filled Title, Subject and Keywords already correctly
- Please leave the comments section empty.
Name the file
- CorrectBot should have set the filenames already correctly - please don't change it (the names of the ODT and the PDF files should be exactly the same except for the extension)
- Use underscores "_" instead of spaces (spaces are automatically converted into underscores by the file upload system).
- The file name should be exactly like the headline of the translated worksheet in your language. This means if there are "special characters" in the title, just write them exactly as they should be in your language (examples: Jak_pokonać_strach_i_złość.pdf, مراحل_بخشش.pdf).
- If there is several versions with the same headline, use brackets for further clarification. Examples: Bible_Reading_Bookmark_(Seven_Stories_full_of_Hope).pdf, Adım_Adım_Affetmek_(Tanrı).pdf (for different language variants).
- Only exceptions: Always remove apostrophes and colons in file names, like Gods_Story_(five_finger).pdf for God's Story (five fingers) or Forgiving_Step_by_Step_Training_Notes.pdf for Forgiving Step by Step: Training Notes
Export PDF file
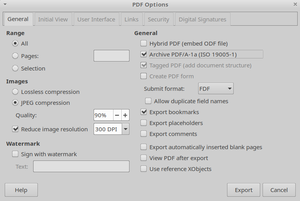
In LibreOffice you can easily export the file as PDF (Menu: File -> Export as PDF). Use the following options:
- Archive PDF/A
- Export bookmarks
- 90% JPEG image compression
- Reduce image resolution to 300dpi
- The rest of the options stays like the default
Checklist
As the file will be public and used by many, please take time to check it:
- Did you run a spell-checker? If you find mistakes, please correct them in the system and afterwards request the ODT-generation again.
- Does it look well?
- Are the page breaks at the right positions?
- Does everything fit on two pages?
- Is the language of the style "Default Style" correctly set to your language?
- Check the PDF file: Are all document properties correct? Are no personal information about you visible? (in Adobe Reader: "File" -> "Properties")
Upload the files
Select Upload file in the left menu:
- Select your created file and leave the destination filename as it is.
- In the summary box write "Version versionnumber".
- For licensing please select "Own work, release into public domain under the CC-Zero license".
Update the translated page
If you haven't already done it, write the file name of your uploaded file into the translation of the page, so that the system can link the correct file for download in the upper right corner. Go to the translation view of the page and at the end you find the sections with the file names and the version number in the end.
- When the English original is updated, the version number will increase. The translated worksheets receive the same version number as the original they're based on. If you update the translation (but the English original didn't change) please add a letter to the version number like 1.5b, 1.5c, 1.5d etc.
- After changing the file, you can directly upload it like explained above. Alternatively you can also use Special:ListFiles, search for your file and then select "upload a new version of this file". Please don't forget to write the version number into the comments section.
Troubleshooting
It can happen that the PDF link doesn't show up in the translated page immediately. You can do the following:
- Is it maybe just your problem? Your browser might have cached the page before and still shows you the old version. Then you need to re-load the page / clear your browser cache. This can usually be done in one of the following ways:
- Press the reload button in your browser.
- Press "Control+F5" (forces reload in most of the browsers).
- Clear browser cache.
- This website uses an internal cache for performance optimization. Especially when you first update the translation and later upload the file it can happen that the download link doesn't show up. Then the internal cache for that page needs to be re-created.
- Go to the page that should be updated. In the upper right corner you find a dropdown link with more actions. Click "Purge" (empty cache).
- If this doesn't solve the problem contact an administrator.
More information
More information for translation administrators: 4training:Creating_English_files

